
Thursday, December 11, 2014
Thursday, December 4, 2014
Lesson 15 Still Life


Live View in EOS Utility and Lightroom 5
Live View with EOS Utility and Lightroom 5 Using Canon EOS utility has a great advantage in Still Life in that you can see in real time how you light is looking on the object. It is especially useful for placing reflectors and gobos. I have made a list of setting in order to use the Canon 5DMIII with Live View in the EOS utility with Lightroom 5. There are two important settings on the Canon that must be made:
1. Go to the Menu with a Red Camera and 4th dot highlighted.
2. Go to Live View/Movie func. Set to enable.
3. Set Silent LV shoot. To Disable. (Must have this set so that the flash will fire when we make a picture with Live View on.
4. In Menu go to the orange camera symbol and the 2nd dot highlighted and scroll down to Custom Controls. Press the set buttom and make the screen look like the example.
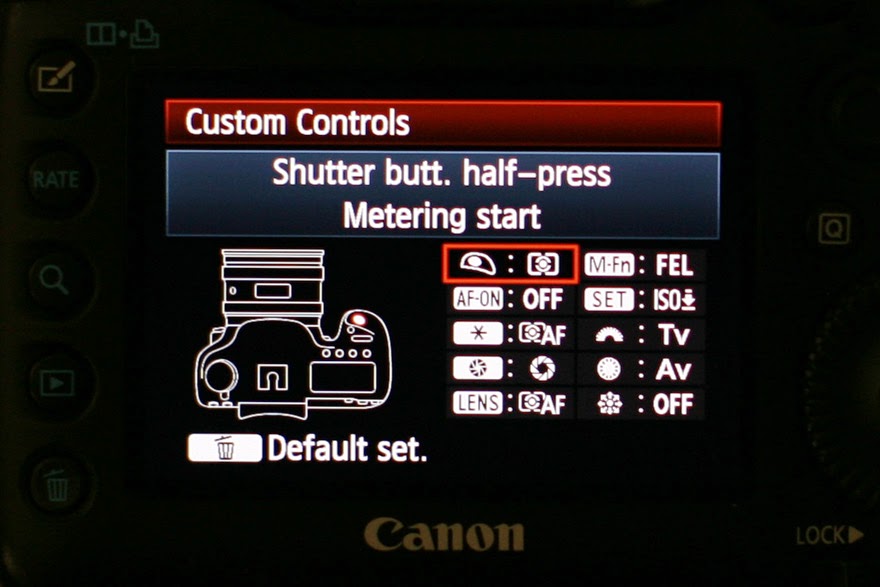
This will set the focus start to the button on the camera with AF-ON and will disable the shuttle button from trying to focus. Now open the Canon EOS utility. You might have to open it in applications.
You should have the camera tethered and on at this point.
1. Click on Camera settings/Remote shooting. You should see the remote shooting screen with all you camera settings. The settings can be changed on this screen.
2. Next go to the Preferences Screen a. Basic Settings only check the Show main window button. b. Destination Folder change the folder to Watched Folder on the desktop and keep everything else unchecked. c. File Name Do not modify d. Download Images set to Images not yet downloaded e. Remote Shooting check box for Save also on the camera’s memory card f. Linked software None g.
OK Now open Lightroom and make the following changes:
1. File®Auto Import®Auto Import Setting
2. Set the Watched folder on the desktop
3. Set the destination folder to somewhere not on the desktop.
4. File Naming set to Filename.
5. Make sure the Enable Auto Import is checked
6. OK Go back to the remote shooting screen and press the Set-up menu then press the Live
View/Movie func.set. button.
1. Under LV func. Setting check Stills only
2. Under Screen settings click Still display
3. OK Now click Live View shoot button 1. Set the white balance to Auto (give a better preview image and does a decent job with the capture) 2. Play with the focus setting and see what works.
3. Take a picture with the remote button and make sure the flash is firing.
We also talked about using the PocketWizard Multi Max on SpeedCycler.
1. Press the Menu button.
2. Press A for Advanced Menu
3. Press D for SpeedCycler
4. Set the channel (Let’s say 17) and have A and B activated by pressing the letter to high light it.
5. Now set the internal pocket wizards on the 1200R packs by turning on off and then set the MultiMax to 17A only and hold down the test button while someone turns on the 1st 1200R pack and the pack fires. This could take a few seconds. Now turn off that pack. Change the MultiMax to read 17B, hold down the test button while someone turns on the 2nd 1200R pack and the pack fires. Turn on the 1st pack. Now set the Multimax so that it is set on SpeedCycler on channel 17 and both A and B are highlighted. Each time you press the test button one strobe will fire at a time and in sequence. ABABAB etc. 6. If you are using the 2400 packs, use the PocketWizard III and set one to 17A and the other to 17B.
Monday, December 1, 2014
Assignment 14 Execute Photograph
Execute the photograph we discussed in class. Post the results, the final lighting setup, and the photograph you emulated as separate images.
Lesson 14 Phase One Camera and Capture One Software
A Brief Description of Setting Up Capture One and the Phase One Camera to Capture to the Studio Computer
1. Open Capture One 7 and start a new session
2. Turn on the Phase One Camera and back and plug in the fire wire cable to the back.
3. Look under the camera icon in the camera section of CaptureOne to see if the PhaseOne P40+ is displayed.
4. Start shooting.
5. At the end of the shoot copy the capture folder to your own had drive and then import into Lightroom.
This is the solution to the inability of the PhaseOne camera to capture during our in house demonstation:
P+ Backs/P backs exc. P20 and P25
The Thunderbolt Terminal does not have the same Power Output as a standard Firewire Port (400 or 800) so it is recommended that the back used be set to "Battery" as the main power source to avoid communication failure.

If there are problems look at the manuals below
Here is the Phase One Camera Quick Guide
Here is the Phase One Camera User Guide
Here is the Capture One Manual
Here is a link to the Phase One Website that talks about Tethered Shooting with Capture One:
Tethered Shooting
1. Open Capture One 7 and start a new session
2. Turn on the Phase One Camera and back and plug in the fire wire cable to the back.
3. Look under the camera icon in the camera section of CaptureOne to see if the PhaseOne P40+ is displayed.
4. Start shooting.
5. At the end of the shoot copy the capture folder to your own had drive and then import into Lightroom.
This is the solution to the inability of the PhaseOne camera to capture during our in house demonstation:
If there are problems look at the manuals below
Here is the Phase One Camera Quick Guide
Here is the Phase One Camera User Guide
Here is the Capture One Manual
Here is a link to the Phase One Website that talks about Tethered Shooting with Capture One:
Tethered Shooting
Wednesday, November 26, 2014
Assignment 13 Night Photography
Go outside between dusk and dawn using whatever existing light is available recognizing its color and mood, make a photograph that is surprising by what it reveals.
Post a photograph that you like the lighting and that you wish to emulate. Sketch out how you think it was lit. You can use this file to make your sketch: http://www.diyphotography.net/lighting-diagrams
Post a photograph that you like the lighting and that you wish to emulate. Sketch out how you think it was lit. You can use this file to make your sketch: http://www.diyphotography.net/lighting-diagrams
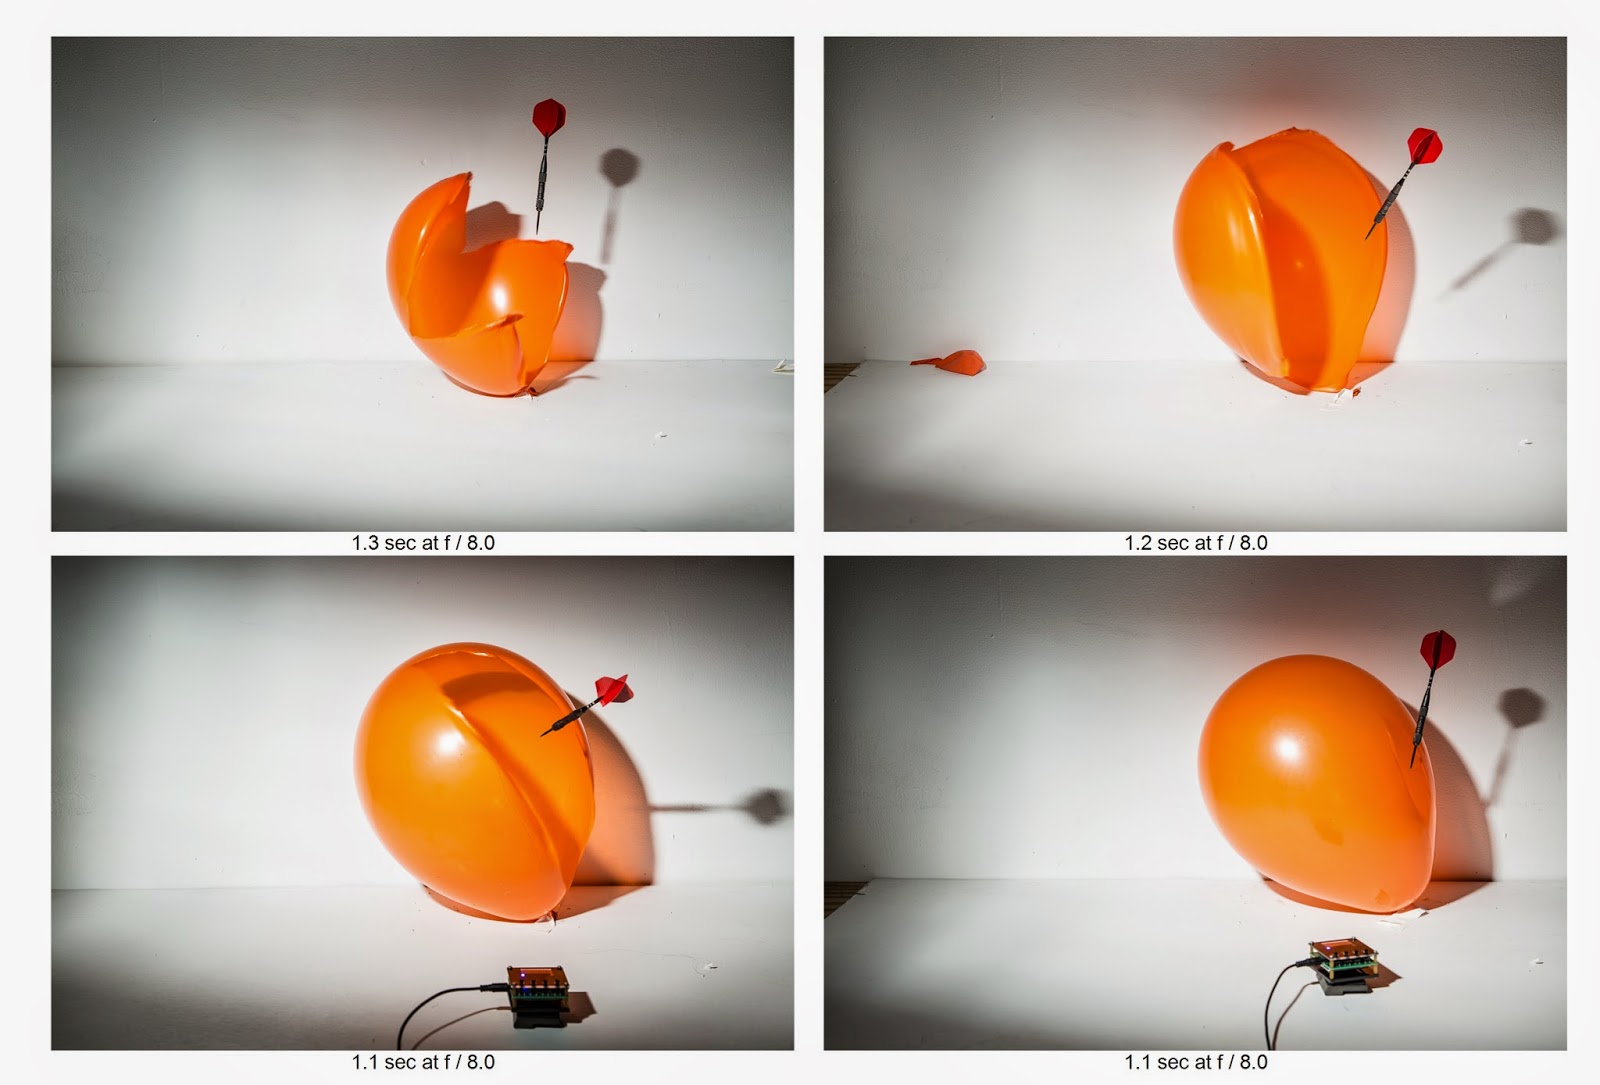
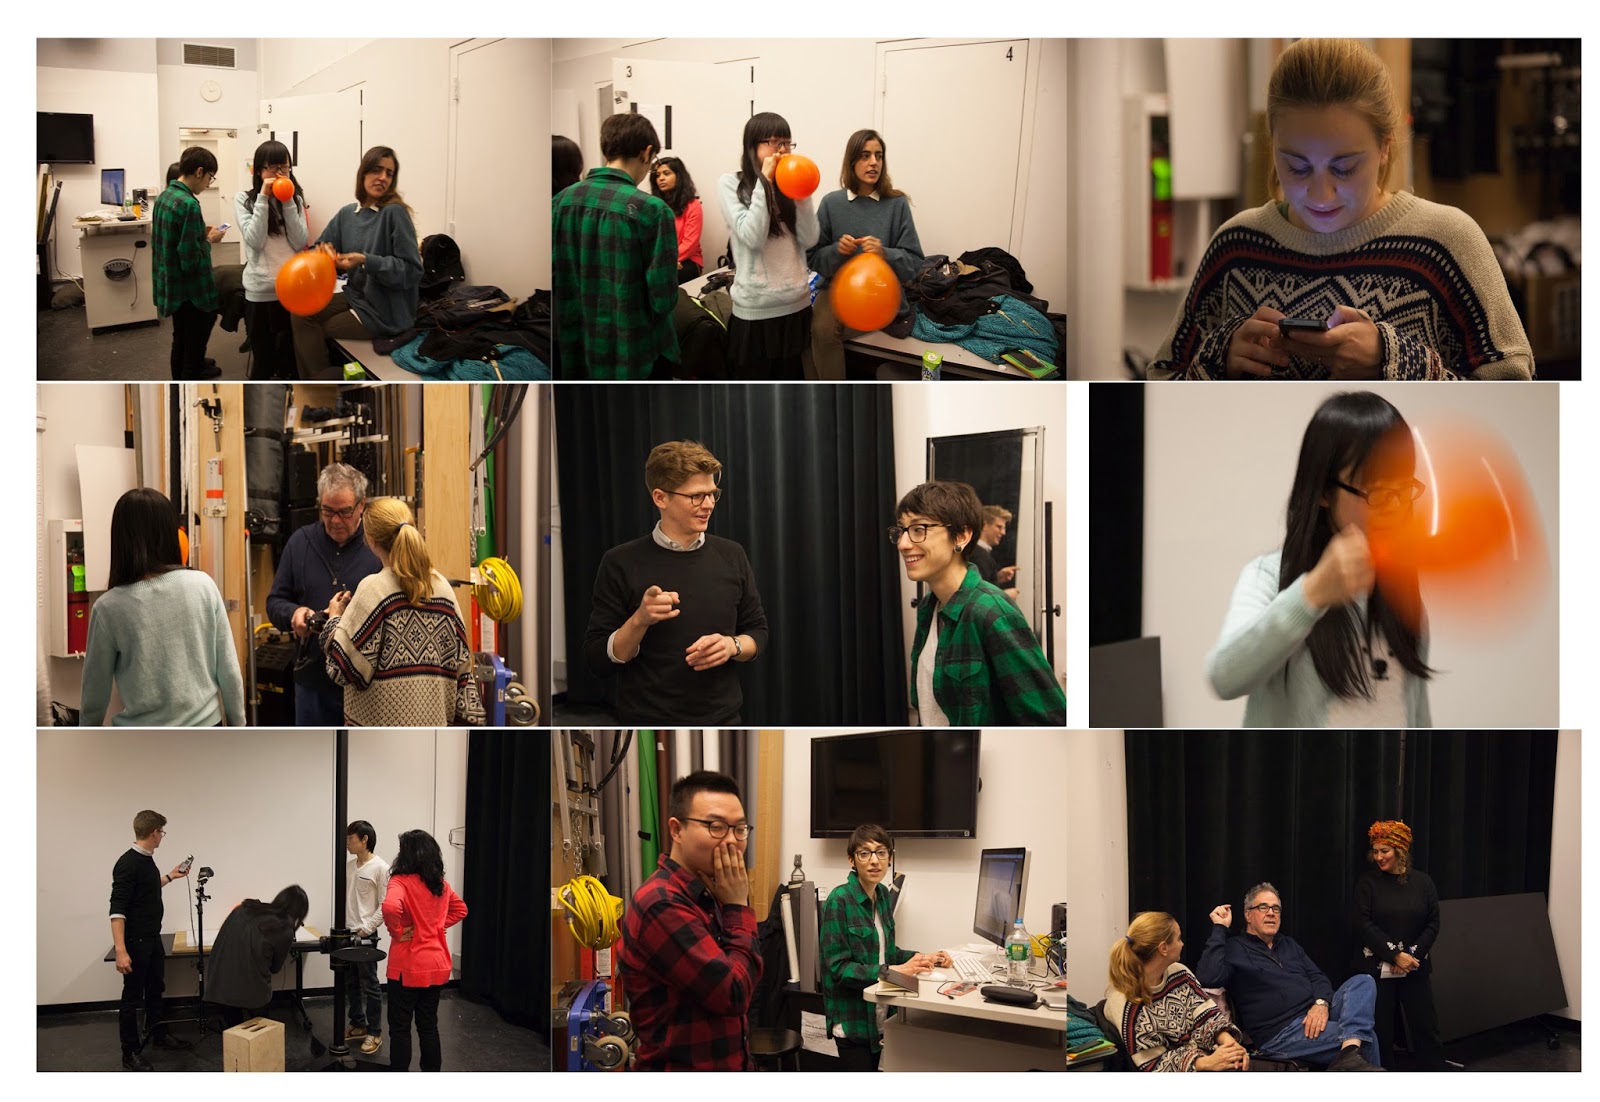
Lesson 13 Night Photography
We used the Digital Multi-Function Trigger to capture a popping balloon at slighting different times by varying the distance of the Trigger to the balloon.
We looked at the work of 3 photographers whose vision of the night is unique.
Brassai


Tuesday, November 18, 2014
Assignment 12 Stop Action
Photograph something in action that you can’t see with the naked eye. Use a camera and flash combination on manual attached to the hot shoe or the off camera cord. The flash should be dialed down to 1/16 power or less in order to achieve a flash duration of 1/10,000 or less. Examples are splashing water or stopping a fans blades with a ribbon attached. I want these images super sharp with no blurs.
Lesson 12 Flash Duration and Syncing
Here is a good article about HyperSync by Rob Galbraith from 2009
Using the PocketWizard Plus III and a shutter speed highert than 1/160 results in second curtain cutoff.

Using the PocketWizard Flex TT5 and the setting HyperSync, we were able to sync up to 1/8000 using the Profoto 2400 Pack at full power and a flash duration of 1/320

Using the High Speed Sync setting on the Canon Speedlite 600EX-RT, we were able to sync up to 1/8000


An explanation of Paul C Buff Einstein strobe to show the two different ways strobe manufactures control the flash output and what that has to do with stopping power and color temperature.
PocketWizard's explanation of HyperSync and HighSpeed Sync
Another blog that we looked at about using the PocketWizard FlexTT5 on High Speed Sync (HSS) mode you could sync our studio strobes at a 1/8,000 sec.

Tuesday, November 11, 2014
Assignment 11 Light Painting
1. Make a photograph using flash as a painting tool.
2. Make a photograph using a continuous light source as a
painting too.
painting too.
Plan what you want to achieve with light painting. The
lighting scheme should be hard to achieve conventionally.
lighting scheme should be hard to achieve conventionally.
Lesson 11 Light Painting


A history of light painting can be seen here:
NY Times Lens article about Harold Ross' work:
This is a link to Harold Ross' blog. He talks about light painting and his techniques:
http://haroldrossfineart.wordpress.com
Much of this work is done with the light source pointed at the camera and recording the light source as it travels. I want to concentrate on another aspect of light painting and that is lighting a subject with the use of a continuous light source such as a flashlight or even a cell phone. Along with this idea of light painting is the idea of using multiple pops of a flash that is moved to different positions throughout the exposure. Since digital photograph has made it easy to combine images with the use of layers, it is now practical to make a series of captures with the flash in different positions and combine them in layers. The easiest way is to use the captures in Lightroom, selecting the images you want to use in Library Grid Mode, right click and choose Edit In… Open as layers in Photoshop. In Photoshop select all the layers and change the blending mode to Lighten. Now all the light from all the layers will be revealed in the image. Next you can turn each layer on and off using the eyeball indicator next to each layer. You can control each of the layers separately with the use of masking and any of the adjustment tools.
To make an image using a continuous light you will need to keep the camera on a tripod and the shutter open. This discussion is for the Canon 5DMIII. Set the exposure for a length of time that will allow you to paint the light on the subject and the background (30 seconds is the maximum time allowable). The room has to be dark enough that it doesn't pick up any stray light during the long exposure. The f stop and ISO are determined by trial and error. With practice a rhythm will develop and improve your painting skills.You can also use the Bulb setting but the shutter has to remain depressed during the entire exposure. You can use the Canon Remote Switch RS-80N3 to release the shutter and keep it open by exposing the red dot on the release handle. Slide the mechanism off of the red dot to close the shutter.
To make an image using a multiple flash image you are going to actually make multiple captures with each exposure having the flash in a new position. With the camera on a tripod and the flash in one hand you setup the remote exposure as outlined below. A special cable is needed which is outlined below.
Remote Camera Setup
We learned how to remotely trigger the 5D MIII by using a special cable called the Canon N3 to mini phone by connecting the N3 side to the Canon's remote control terminal and the mini side to the Pocket Wizard II's camera port. By setting another Pocket Wizard Plus II to the same channel as the one attached to the camera, the camera shutter can be released by the remote Pocket Wizard Plus II when you press the test button remotely. We need a third Pocket Wizard Plus II to be attached to a Canon 600EX-RT (this is the only Canon flash with a pc connection) using a pc to mini cable. The pc end is inserted into the flash's pc terminal and the mini end is plugged into the 3rd Pocket Wizard Plus III's flash terminal. The 3rd Wizard has to be set on a channel that is one number higher than the other two Wizards. The 600EX-RT is set on External Manual Metering by using the custom function 5 option 3 as described below. Now we have the 600EX-RT and 3rd Pocket Wizard Plus II in one hand and the remote camera firing Pocket Wizard Plus III in the other. As we point the flash where we intend the light to land, we push the test button on the 1st Wizard and it trips the shutter and then automatically uses the pocket wizard mounded in the camera's hot shoe to sync with the flash and 3rd PocketWizard that is set on the next higher numbered channel. The subject needs to remain perfectly still and then as many captures from as many positions can be captured.
To use the flash on Manual External Metering you will need to the page from the manual which is at the bottom of the page. There is a external reflected light sensor on the front of the 600EX-RT that will read the light where the flash is pointed.
How to use the PocketWizard Plus III for light painting


How to set the 600EX-RT to work with light painting

Wednesday, November 5, 2014
Assignment 10 Canon Transmitter ST-E3=RT and 600EX-RT Flash
Work in Groups in the Studio for this Assignment. Each member of the group should make a portrait using 3 Speedlites from different directions, controlled manually from the Transmitter attached to the camera which is also set on manual. Each member of the group should make a unique lighting setup. You can modify the light coming from the 600EX to a broad source of light by using diffusion, umbrella, soft box or bouncing off a wall or card. You can also use the light directly.
Set the Master to GR and set A, B, C and D (Optional) to M. The three slaves will set themselves to M after the test button on the transmitter is pressed. Use the ST-E3-RT to adjust the setting manually.

Take a picture of the ambient light in the room at the fstop and shutter speed you will be using. It should come out black. Post this picture with it's settings.
Post the the progression of images (ie one light, 2 lights, 3 lights etc) with final exposure for each shot (should all be the same)
I realize this is an ambitious assignment and that you might not have time for each member of the group to accomplish their own unique version. Do the best you can and good luck.
Set the Master to GR and set A, B, C and D (Optional) to M. The three slaves will set themselves to M after the test button on the transmitter is pressed. Use the ST-E3-RT to adjust the setting manually.
Take a picture of the ambient light in the room at the fstop and shutter speed you will be using. It should come out black. Post this picture with it's settings.
Post the the progression of images (ie one light, 2 lights, 3 lights etc) with final exposure for each shot (should all be the same)
I realize this is an ambitious assignment and that you might not have time for each member of the group to accomplish their own unique version. Do the best you can and good luck.
Lesson 10 Using the Canon Speedlite ST-E3-RTand the 600EX-RT with the Canon 5DMIII


Bruce Dorn's Introduction to Canon's Speedlite's system click here
Quick Guide to Speedlite Transmitter ST-E3-RT Setup click here
There is a way to adjust the Speedlite setting on the 5DMIII. Check out where to find Flash Function Settings in the 2 pages from the camera manual. You might find it easier to make adjustments:


Wednesday, October 29, 2014
Assignment 9 Canon Dedicated Flash
Here is how to change the flash sync speed in Av mode:

Use direct flash on camera Aperature Priority (Av) setting at 1/200 sec shutter speed
Use direct flash off camera Aperature Priority (Av) setting at 1/200 sec shutter speed
Use flash fill Aperture Priority Auto shutter speed
Use flash with modifier (Bounce card, bank or ceiling) Aperature Priority (Av) setting at 1/200 sec shutter speed.
Label your best result from each of the 4 techniques, write down your camera settings for each photograph and post them separately.
Read the two pages (posted in the Lesson 9 section) from the Canon 580EXII or the Canon 600EX manual to help understand what the settings mean
Lesson 9 Dedicated Flash
Some photographers who use off camera flash extensively:
Bruce Gilden Website
Instructions for using Canon Speedlite 580EX

Instructions for using Canon Speedlite 600EX-RT


Wednesday, October 22, 2014
Assignment 8 Outdoor Flash
1. Make a portrait where the person’s face and the background are the same exposure.
2. Make a portrait where the person’s face is exposed one stop under and the background is normally exposed. Drop the power of the strobe by one stop keeping the f stop the same.
3. Make a portrait where the person’s face is normally exposed and the background is one stop under.
4. Make a portrait where the person’s face is normally exposed and the background is two stops under.
All four should be photographed in exactly the same place to make it earier to compare the results.
This is a test for your reference and should be laid out accordingly.
Print your f stop and shutter speeds.
Subject should be 2 or 3 stops darker than background.


Wednesday, October 15, 2014
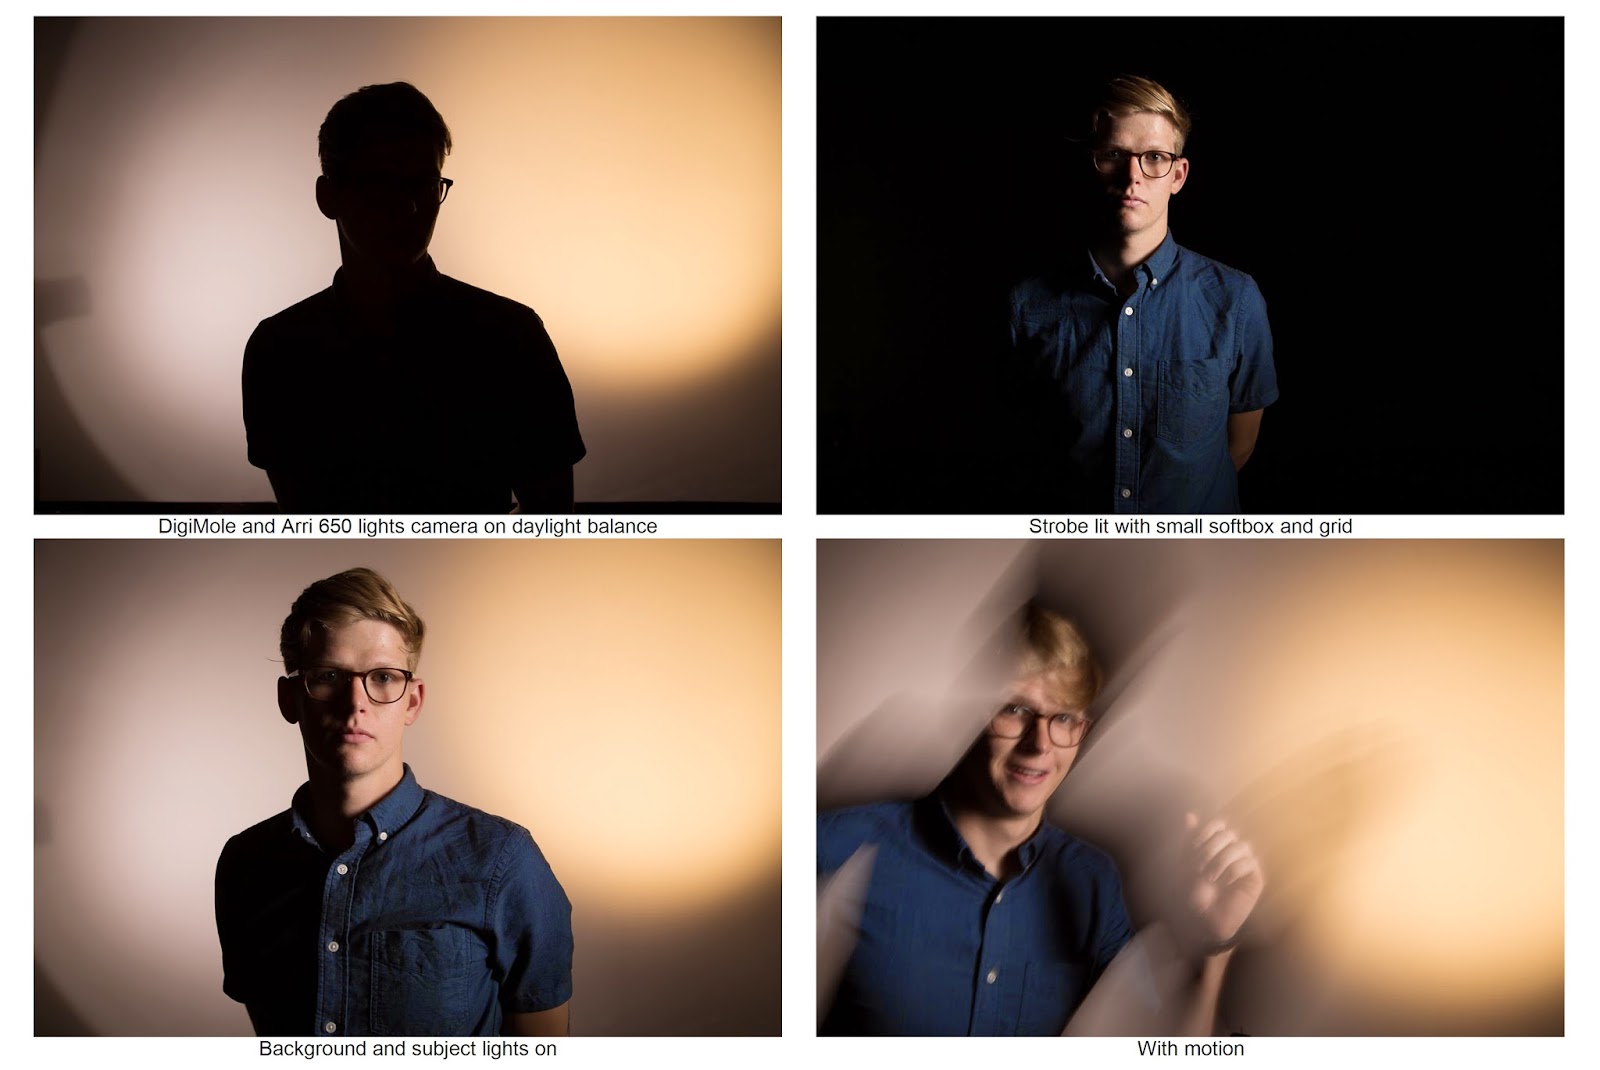
Assignment 7 Strobe and Continuous Light
Set the camera on Strobe light balance.
Photograph a person with just the strobe light on the person
Photograph a person with just the tungsten light on the background
Photograph a person using strobe on the person and tungsten
on the background combined
Try some with motion.
Set the camera on Tungsten light balance.
Photograph a person with just the strobe light on the background
Photograph a person with just the tungsten light on the person
Photograph a person using strobe on the background and tungsten
on the person combined
Photograph a person with just the tungsten light on the person
Photograph a person using strobe on the background and tungsten
on the person combined
Try some with motion.


Wednesday, October 8, 2014
Assignment 6 Size Matters
Take two portraits of a person one with the 21" Beauty Dish and one with the Octabank and get the same results by using the placement of the subject, the light and the background. Look at results from class demonstration for ideas.


Thursday, October 2, 2014
Assignment 5 One Strobe and a Softbox
Photo 1
Using one strobe with a softbox, light a person against a white background so that their face has a highlight and shadow side. The background should appear darker on the highlight side and the lighter on the shadow side.
Photo 2
Using one strobe with a softbox, light a person against a white background so that their face is evenly lit and the background is black.


Subscribe to:
Posts (Atom)